Building and Testing
Thorough testing and validation are critical when developing comfortable in-var experiences. While prototyping in the Unity Editor is performed on desktop platforms, the final experience is designed to run natively on mobile hardware.
flowchart TD
    Start([Development Mode]) --> DevChoice{How are you testing?}

    %% Left Branch: Editor
    DevChoice -->|Option A: In-Editor Prototyping| EditorPath["File Playback (No Vehicle Required)"]
    EditorPath --> ReplayObject("Load .holo / Replay ScriptableObject")
    ReplayObject --> ReplayBackend("Enable ReplayStateReceiverBackend")
    ReplayBackend --> Play("Press 'Play' to simulate ride")

    %% Right Branch: Hardware
    DevChoice -->|Option B: In-Vehicle Testing| MobilePath["Live Sensor Stream (Real-Time Telemetry)"]
    MobilePath --> SwitchAndroid("Switch Unity Platform to Android")
    SwitchAndroid --> ServiceBackend("Enable ServiceStateReceiverBackend")
    ServiceBackend --> SPE("Connects to Spatial Perception Engine <br> on mobile / retrofit hardware")

    %% Merging
    Play --> AppFinished([Vehicle Prefab Moves in Sync with the Telemetry])
    SPE --> AppFinished

    %% Styling (Borderless automatically via global CSS)
    style Start fill:#2196F3,color:#fff
    style EditorPath fill:#9C27B0,color:#fff
    style MobilePath fill:#FF9800,color:#fff
    style AppFinished fill:#4CAF50,color:#fff
    style DevChoice fill:#CCCCCC,stroke-width:0px
    style ReplayObject fill:#CCCCCC,stroke-width:0px
    style ReplayBackend fill:#CCCCCC,stroke-width:0px
    style Play fill:#CCCCCC,stroke-width:0px
    style SwitchAndroid fill:#CCCCCC,stroke-width:0px
    style ServiceBackend fill:#CCCCCC,stroke-width:0px
    style SPE fill:#CCCCCC,stroke-width:0px
Replay Holo Files & Prototyping
To allow you to iterate rapidly at your desk, the Spatial Experience SDK features a comprehensive Ride Replay pipeline. This system lets you play back recorded or simulated vehicle localization data directly inside the Unity Editor, simulating real-world movement and telemetry on demand.
All recorded vehicle rides are represented in your assets as Replay scriptable objects.
1. File Playback
Replays are typically generated from real-world telemetry packets stored as .holo or .holo2 files.
- Auto-import: A default, full-length Replay asset is automatically compiled whenever a
.holoor.holo2recording is imported into your Unity project assets. - Slices: You can create multiple custom Replay assets referencing different time slices of a single recording to test specific routes or events.
Tip
Synthetic Rides (Routes): You can also use Route assets (generated from .kml files or addresses) as a source for synthetic rides. To generate a Route asset from street addresses directly in Unity, right-click in the Project window and select Create > holoride > Route from Addresses.
2. Configuring the Playback Backend
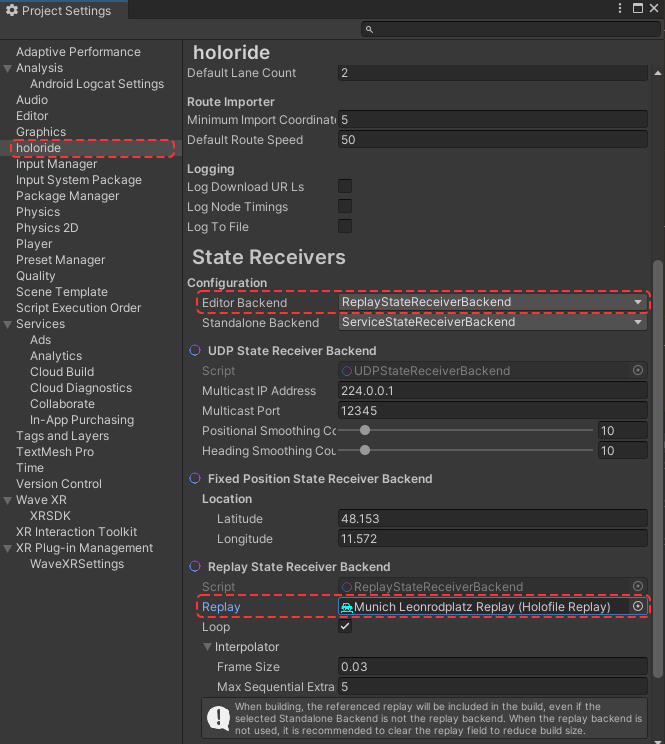
To feed recorded ride telemetry to your scene, you must configure the ReplayStateReceiverBackend:
- Locate the StateReceiver component in your active scene or configuration.
- Under the Editor or Travel backend settings, select the
ReplayStateReceiverBackend. - Assign your desired Replay asset to the Replay inspector field.
- Tip: You can download a rich library of pre-recorded ride files from the official repository here🔗.
Note
Dynamic Recording: You can record your own live ride data (.holo files) during real-world tests. Simply trigger recordings directly via the Spatial Perception Engine.
Live Vehicle Data Source (State Receiver)
When compiling your build for real-world in-vehicle testing, you must configure the application to stream live telemetry from the vehicle's physical sensors instead of playing back files.
- The Connection Backend: This stream is handled by the ServiceStateReceiverBackend, which connects securely to the Spatial Perception Engine running on the target device.
- Activation: Locate your active StateReceiver component and select
ServiceStateReceiverBackendas the Travel Backend target. This allows your app to dynamically bind to the vehicle software stack / retrofit Hardware on startup.