In-Vehicle Tests
Sooner or later, you'll want to test your development effort in a vehicle. There are some changes that need to be made compared to when testing at a desk. We'll go through those changes below.
Changing between "Desk" and "Vehicle" Configurations
When you want to switch between desk testing and real-world in-vehicle testing, you have to make sure that your camera rig, including the Main Camera, is parented correctly to the fitting scenario in the holoride Player prefab. You also have to ensure the correct StateReceiver configuration.
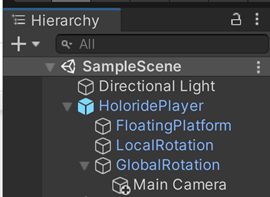
The two child GameObjects within the holoride Player that impact how the camera rotates in relation to world space and vehicle changes are LocalRotation and GlobalRotation.
Put your Main Camera into GlobalRotation before you hop into a car and try it out. Putting the Main Camera into LocalRotation is a convenience feature for testing at your desk.
Note
You can configure the StateReceiver either by selecting the asset or in the holoride Project Settings category.
Important
Placing the Main Camera under the GlobalRotation object ensures the player keeps facing forwards as the vehicle travels in real-world space when the real-world vehicle turns.
Vehicle Data Sources / State Receiver
When testing in the vehicle, you will usually want the data source for vehicle localization to be a live data stream of the vehicle's sensors.
This data is provided through the ServiceStateReceiverBackend. This backend receives live data from the holoride DevKit or a supported vehicle.
Select it as the Standalone Backend in the StateReceiver.